I am working with drupal 7 really its crazy but some how i confused in drupal $form & $form_state
I discussed with many people now i got some clarification on this $form & $form_state values.$form defines the form, $form_state carries information about the processed form.
function test_form_validate($form, &$form_state) {

  if ($form_state['values']['name'] == '') {

    form_set_error('name', t('You must select a name for this group of settings.'));

  }

}
Description:
Format a set of checkboxes. #options is an associative array, where the
key is the #return_value of the checkbox and the value is displayed.
The #options array cannot have a 0 key, as it would not be possible to
discern checked and unchecked states.
Step1:- Download mod_auth_sspi-1.0.4-2.2.2
from google Step2:- Install mod_auth_sspi.so
module in apache modules folder Step3 :- LoadModule
sspi_auth_module modules/mod_auth_sspi.so
in httpd.conf file Step4 :- Add below
code to httpd.conf file <Directory
"C:/Program Files/BitNami WAMPStack/apps/htdocs/itscrefresh">
Options Indexes FollowSymLinks
AllowOverride All
Order allow,deny
Allow from all
AuthName "NTLM"
AuthType SSPI
SSPIAuth On
SSPIAuthoritative On
SSPIDomain Domain name
SSPIOfferBasic On
SSPIBasicPreferred On
require valid-user
</Directory> Step5 :- Restart apache
server and check
Node module manages the creation, editing, deletion, settings, and display of the main site content. Content items managed by the Node module are typically displayed as pages on your site, and include a title, some meta-data (author, creation time, content type, etc.), and optional fields containing text or other data
Usage Node
Creating content
When new content is created, the Node module records basic information about the content, including the author, date of creation, and the Content type. It also manages the publishing options, which define whether or not the content is published, promoted to the front page of the site, and/or sticky at the top of content lists. Default settings can be configured for each type of content on your site.
Creating custom content types
The Node module gives users with the Administer content types permission the ability to create new content types in addition to the default ones already configured. Creating custom content types allows you the flexibility to add fields and configure default settings that suit the differing needs of various site content.
Administering content
The Content administration page allows you to review and bulk manage your site content.
Creating revisions
The Node module also enables you to create multiple versions of any content, and revert to older versions using the Revision information settings.
User permissions
The Node module makes a number of permissions available for each content type, which can be set by role on the permissions page.
The Taxonomy module allows you to classify the content of your website. To classify content, you define vocabularies that contain related terms, and then assign the vocabularies to content types.
Best Example of USAGE :
Uses
Creating vocabularies
Users with sufficient permissions can create vocabularies and terms through the Taxonomy page. The page listing the terms provides a drag-and-drop interface for controlling the order of the terms and sub-terms within a vocabulary, in a hierarchical fashion. A controlled vocabulary classifying music by genre with terms and sub-terms could look as follows:
vocabulary: Music
term: Jazz
sub-term: Swing
sub-term: Fusion
term: Rock
sub-term: Country rock
sub-term: Hard rock
You can assign a sub-term to multiple parent terms. For example, fusion can be assigned to both rock and jazz.
Terms in a free-tagging vocabulary can be built gradually as you create or edit content. This is often done used for blogs or photo management applications.
Views
Create lists, tables, and feeds of content. This can be nodes, comments, users, or entities of any type.
Token
Use generic placeholders to display dynamic data. Token is usually installed as a dependency for another
module.
Pathauto
Automatically create search engine-friendly, human-readable URLs based on customizable patterns. An example URL alias is http://drupal.org/project/pathauto.
Administration Menu
Provides a horizontal, drop-down style administration menu at the top of each page, with links to all major administrative tasks.
Date
Creates a flexible date/time field and provides an API for other modules to use.
Google Analytics
Adds the Google Analytics web statistics tracking system to your site.
wysiwyg
Wysiwyg (What You See Is What You Get) provides a word processor-style content editor in the browser, similar to the interface of popular office applications like LibreOffice or Microsoft Office.
Webform
Create custom input forms for surveys, contest entry forms, contact forms, petitions and the like.
Chaos tool suite
Provides APIs and tools. This module is generally installed as a dependency of other modules.
Panels
The Panels module allows a site administrator to create customized layouts for multiple uses. At its core it is a drag and drop content manager that lets you visually design a layout and place content within that layout. Integration with other systems allows you to create nodes that use this, landing pages that use this, and even override system pages such as taxonomy and the node page so that you can customize the layout of your site with very fine grained permissions.
Drupal's module system is based on the concept of "hooks". A hook is a PHP function that is named foo_bar(), where "foo" is the name of the module (whose filename is thus foo.module) and "bar" is the name of the hook. Each hook has a defined set of parameters and a specified result type.
To extend Drupal, a module need simply implement a hook. When Drupal wishes to allow intervention from modules, it determines which modules implement a hook and calls that hook in all enabled modules that implement it.
In Drupal7 you can install modules from the admin section, but I still feel this new feature doesn't have any meaning, because we have to search for the module link in the Druapl site and then copy paste into the admin module installation area, really crazy. It would have been so good if they would have made it something like wordpress a small search feasture. Anyway I just gonna download and istall it in the old way (I still recommend this old way).
Download all the modules from Drupal site and install in the directory yoursitename/sites/all/modules.
Go to http://www.yoursitename.com/node#overlay=admin/modules and enable these modules as below;
(1) Views (2) Views UI (3) Views Slideshow (4) (5) Chaos tools (6) Link (7) Libraries (8) Token (Optional)
(3) Create Image Cache
In Drupal7 imagecache is part of core module and is named as Image styles. So let's create two image cache from here, one for the full size slider image and other for the thumbnail image. In this tutorial I use 935x293 (pixels) dimension for the full size slider image and 210x100 (pixels) dimension for the thumbnail image. Note: These configurations csn be defered depends on your needs. * Fullsize Slider image settings
Go to http://www.yoursitename.com/node#overlay=admin/config/media/image-styles and click on the add new style link
(1) Give an Image style name and click on create new style button
(2) On the next configuration screen select new style you want and then click add button (In this tutorial I choose resize style)
(3) On the next screen set the width and height and click on the add effect button. (The settings may vary depend on the style you choose). I set width as 935 and height as 293 pixels.
Do this same process for the thumbnail image too. (for the thumbnail image dimension, I set width as 210 and height as 100 pixels.)
(4) Create New Content Type
Let's create a new content type, From the dashboard menu bar cick on Structure and then content types then click on the add new content type link.
(1) Give a human-readable name, I named it as Featured Slider (machiine name will be auto generated based on the human readable name)
(2) Give a brief and relevant description
(3) Submission form settings, I leave as the default settings
(4) Publishing options, I checked only published (all other settings unchecked)
(5) Display settings, I have unchecked the authour and date info.
(6) Comment settings,I set hidden (disabled)
(7) Menu settings, I leave as default settings.
(8) Click Save and add fields Button
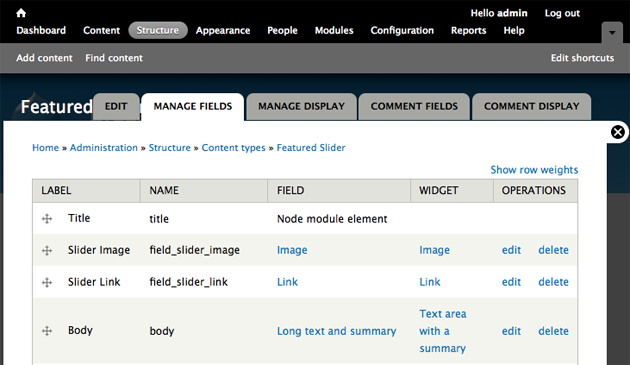
(5) Create New Fields
Here in this example I create only two fileds, and they are image field and link field.
We will use image field for uploading our slider image and link field for creating a custom link where we want our slider to be linked. Image Field Settings
(1) Label: Slider Image
(2) Field: slider_image
(3) Field type: image
(4) Widget (form element): image
(5) Click Save button, and on the field settings page leave default settings and click on Save field settings button.
(6) On the image field configuration settings page you can configure as you wish.
I set this field as required, I added a file director name called slider-image so that this images will be arranged sperately from other images.
You can set the maximum upload size and resolution here, I have anabled alt and title field and finally click Save settings button.
By using same method create the link field too. Link Field Settings
(1) Label: Slider Link
(2) Field: slider_link
(3) Field type: link
(4) Widget (form element): link
(5) Click Save button,
For the link field configurations leave evrything to default settings.
I have re arranged the field like shown below;
Title field
Image field
Link field
Body field (you can even remove this field if not necessary)
Manage Display
On the manage display tab you can conigure how the out put of the field to be diplayed.
I have set the link field as hidden and I have also set image label as hidden
(6) Create Feature Slider Content
I have created four featured slider content for this tutorial.
(1) Click on add content link
(2) Create Featured Slider content
(3) Give a proper title name
(4) Upload slider image
(5) Give alt and title field names
(6) Give a link title and url where you want the slider to be linked
(7) Leave all othe settings as default except for the path field if yo want you can give an SEO friendly URL alias.
(8) Save the content.
Same way create more Featured Slider contents (I have created four contents)
(7) Create a New View
Now it's time to create our new Slideshow view.
From the Dashboard menu click on the Structure and then click on the Views.
(1) Click add new view link
(2) Give view name, I have named as Featured Slider (machiine name will be auto generated)
(3) Give an apropriate view description
(4) Choose Show Content of type Featured Slider (your content type name).
(5) Uncheck Create a Pge and check Create a block
(6) Type in Block title and choose display format as "Slideshow" of "fields" items per page 5 (you can enter the number of items you want to display)
(7) Click the button "Continue & edit" Views Field Settings
First let's add link field (link must be the first field in order to work everything properly) so click on the add icon and from the filter Groups select Content
Add Content: Link, Click "Add & configure button" in the next cofiguration window uncheck "Create a label". "Check" Exclude from display.
Click "Apply button"
Next let's add image field, so click on the add icon and from the filter Groups select content
Add Content: image field (Note:make sure you choose the image field which we crerated for this slider content type only.)
Click "Add & configure button" in the next cofiguration window uncheck "Create a label". Formatter: Image (if you have installed Colorbox or lightbox you can choose them here!) Image Style: Fullsize (Choose the imagecache you have created in the above step) Link image to: Nothing Style Settings: Leave default settings No result behaviour: Leave default settings Rewrite Results: Check Output this field as a link Link path: [view_node] (Note:Scroll dow a bit and you can see replacement patterns created by Core Token module, (if we didn't set the link field as first we can't see link field option here) copy only [view_node] then scroll up and paste it in the link path field.)
Click "Apply button"
Finally we need one more field for the thumbnail, so let's click on the add icon and from the filter Groups select Content
Add Content: image field (Note:make sure you choose the image field which we crerated for this slider content type only.)
Click "Add & configure button" in the next cofiguration window uncheck "Create a label" and CHECK EXCLUDE FROM DISPLAY, Formatter: Image (if you have installed Colorbox or lightbox you can choose them here!) Image Style: Thumbnail (Choose the imagecache you have created in the above step) Link image to: Nothing Style Settings: Leave default settings No result behaviour: Leave default settings Rewrite Results: Check Output this field as a link Link path: [view_node] (Note:Scroll dow a bit and you can see replacement patterns created by Core Token module, (if we didn't set the link field as first we can't see link field option here) copy only [view_node] then scroll up and paste it in the link path field.)
Click "Apply button" Views Filters Settings In views3 the filters are created in the beginning while we choose the content type and other settings! If you need any additional filetering you can create it here! Views Style Settings
Click on the Format Slideshow | settigs and on the next configuratioin window set as below;
(1) List type: Unordered list
(2) Wrapper class: Leave default settings
(3) Style> Skin: deafult
(4) Slides> Slideshow type: cycle
(5) Cycle options You need to download jQuery cycle plugin and copy jquery.cycle.all.min.js to sites/all/libraries/jquery.cycle You can find the plugin athttp://malsup.com/jquery/cycle. IN SIMPLE ENGLISH
Create a folder named "libraries" in the site/all directory and then create an another folder named "jquery.cycle" in that directory and finally copy and paste only the "jquery.cycle.all.min.js" into this directory.
(6) Transittion: Fade
(7) Action: pause on hover
(8) Internet Explorer Tweaks: default
(9) Widgets: You can choose either or both Top and Bottom (I choose bottom here, and the advance settings as below;)
(10) Bottom Widgets>Pager>Pager type: Fields
(11) Pager field: Content: Image (Note:last one we added for the thumb, don't mistake since both field will be named same.)
(12) Activate Slide and Pause on Pager Hove: checked, controls and slider counter leave unchecked.
(13) Click Apply button. Format Show Field Settings
Inline fields: Choose the thumbnail field as inline.
Click Apply button. (Note: Well it actually doesn't change much in appearance but it does change in the code. Next step use the firebug and find the class and add some styles to display properly.)
(8) Create a Custom Region (optional step)
(1) On your thems folder open the your_theme_name.info file and add a new region like this shown below; regions[featured_slider] = Featured Slider and save the .info file.
(2) Open your themes page.tpl.php file and add these code where you want your slide to be displayed as shown below; <?php if ($page['featured_slider']): ?>
<div id="featured-slider">
<?php print render($page['featured_slider']); ?>
</div> <!-- End Featured Slider-->
<?php endif; ?>
You can even create custom front page template like page--front.tpl.php so that you do't need to make any changes to the default page.tpl.php template.
[9] Enable & configure the Block
Now this block will be visible in the blocks disabled area, so from the Dashboard menu go to Structure>Block and enable the block to a themes default region or the custom region we created (featured_slider). (Regions varies depends on the theme you are using.) Block Configuration Settings
After enabling the block you get a link to configure the block so click on the Configure link and on the settings section set as below;
(1) Block title (if you don't want blobk title to be displayed just type <none>)
(2) Again you get all enabled theme specific Region settings. On visibility setings
(3) Pages>Show block on specific page: choose Only the listed pages and type <front> so that this block will be displayed only on the front page.